Dice Polishing FAQ
What do I need?
I've linked most things here: AMAZON LIST
- 1000 Grit Sandpaper
- A Quarter Pack of Zona Polishing Papers ( I have these in the shop but they'll also be included in the link below)
- Nitrile Gloves
- Dust Mask
- Novus Plastic Clean & Shine Step 1
- Small Bowl (big enough to fit all the dice, submerged)
- Pitcher of Water
- Microfiber Towels
- Paper Towels
- Pen
- Extra Soft Toothbrush
*ADDITIONAL ITEMS FOR POTTERY WHEEL POLISHING*
- Pottery Wheel
- Acrylic Disc sized to Pottery Wheel
- Fun Tak
How do I attach the Acrylic Disc to my Pottery Wheel?
When you get Fun-Tak it has a tendency to break apart as you stretch it, keep stretching it and folding it over until it gets to a stretchy consistency that doesn't just break, it should become more like a fresh mozzarella stick being stretched.
When you get to that stage, create yourself 5 small equally sized spheres, about half an inch in size to place on your acrylic. I do one in the center and then the remaining 4 spaced out around that just like a5 is pipped on a pipped D6's.
You'll then flip this over onto your pottery wheel so the Fun-Tak is between the acrylic and your pottery wheel. Push it down evenly.
Make sure each of the pieces squishes down evenly and give it a few little twists to make sure it's really secured it down. Push your finger all over the place too and make sure there's no give - this should essentially be permanently on there. You can use a level if you've got one on hand but it's not a requirement.
This should keep your acrylic on your pottery wheel for the foreseeable future. I did this in 2019 and have yet to have to do it again. I tried using hot glue, tape, velcro and silicone caulk - all of them either released pretty quickly or created an unstable surface which caused a rocking motion and your dice come out wonky.
What are Zona Polishing Papers?
TLDR - They're magical polishing sheets that when used properly give us a glassy finish on our dice.
Each sheet of 3M Micro Graded Wet/Dry Polishing Paper is 8-1/2″ x 11″. Each grade is color coded for easy identification.
Abrasive grit is on darker or more intensely colored side of sheets.
Aluminum Oxide / Silicon Carbide 3M polishing papers with super flexible non-woven backings for polishing flat or curved softer surfaces: acrylic, polyurethane, solid surface composites, fiberglass, aluminum, precious metals and finished wood.
Comprised of micron-graded aluminum oxide and silicone carbide particles slurry coated onto a non-woven synthetic backing, the superior flexibility of this product allows for fast and easy finishing and polishing on flat and contoured surfaces.
• Finish plastic, polyurethane, wood, and solid surface composites
• Removes scratches and restores transparency to acrylic and polycarbonate windows.
• Precision micron grading provides a uniform, consistent finish.
• Faster hand-sanding and buffing time.
• Reduces finishing steps.
• Use wet or dry.
• CD/DVD repair
• Metal and alloy finishing
• Finish jewelry and precious metals
• Color-coded micron grading for easy selection.
Zona Polishing Papers, in order
1: Green - 30 Micron
2: Gray - 15 Micron
3: Blue - 9 Micron
4: Pink - 3 Micron
5: Aqua - 2 Micron
6: White - 1 Micron
As you can see, we work down with microns so we're making the scratches on the worked face smaller and smaller as we go down in number until they're imperceptible to our eyes.
To put that into perspective, the average human hair is 70 Microns in diameter.
How to Polish Dice with a Pottery Wheel
Step 1 - What do we need to work on?
After waiting at least 72 hours (Check your Resin MSDS for the FULL CURE time frame, sometimes the 24 hours is just cured to TOUCH)
Grab yourself a paper towel and a pen. Draw yourself a grid on your paper towel in a way that you can lay each of the dice on it and have the faces you're working on written next to it, I also like to label which die goes where - that way you don't miss any. While working I keep the dice in water but in between different sheets I have the paper towel to lay them on.
Make note of each of the faces that have flaws that you want to work on, sometimes you can get away with just the 1 faces but often times the ones surrounding them need work as well.
If the flaws you're working on are on the more severe side, you may need to use the 1000 grit sandpaper to take care of those, when this happens I tend to do every side but that is a personal preference - just pay attention for wandering corners. If you don't have anything you need to sand, move onto Step 3 from here.
Step 2 - 1000 Grit Wet/Dry Sandpaper
1000 Grit Sandpaper
Be sure to use your gloves and mask. I prefer to do this step by hand because the pottery wheel can go too far really fast, even with practice.
I use an acrylic disc but you just need a hard smooth FLAT surface to work on.
Dip the die you're working on in your bowl of water and splash a little bit on your sand paper and do 5 very light rotations on each of the faces you want to work on, I prefer to work in more of an oval shape and you don't want to use much pressure here - just let the die glide along the paper. I rinse the die off between each of the faces to get any debris off, you'll really be thanking yourself later when you're not digging sanding dust out of your numbers.
Check the sides you worked on and be sure you've removed most of the flaw, it doesn't entirely need to be gone, you just don't want anything protruding or sharp so we don't tear up the sheet. If there's anything left, go back on those faces with 3 rotations and repeat until you're happy with what you've got.
Swap out your water. You don't want particles sized from the sand paper intermingling with your green sheet water or you're introducing scratches right from the beginning.
Step 3 - Green Zona Polishing Paper
Green Zona Polishing Paper (30 Micron)
If you're coming from step 2 you've already got your water, if you're just starting now you'll need a bowl of water for this step.
Dip your whole zona paper (I use quarter sheets - so 5.5" x 4.25") in your bowl of water and put it on your pottery wheel, then you'll want to turn it on to get some excess water out and the sheet will actually suction itself to your plexi, no attachment needed.
Do 5 revolutions on each of the faces you need to work on. Let the paper and pottery wheel do the work , there's no need to put pressure on them, just make sure they're level with the sheet and let it glide while you make an oval motion.
Once you've gone through all of the faces you want to work on check them over and be sure you've removed the flaws you're able to, if not do 1-2 revolutions and repeat until you are.
Any imperfection you see after this step will be in the end product, but remember these are handmade - it's okay to have a few maker marks.
Once you've repeated this on each of your dice give them a really good rinse, if you have dust in any of the numbers use your toothbrush to get anything out, I find doing like a C motion down into the number with the bristles works best.
Get rid of the water you used for this step, wipe out your bowl and refill it for the next step.
Step 4 - Gray Zona Polishing Paper
Dip your Gray Zona Paper in your bowl of water and put it on your flat surface just like you did with the green sheet.
Do 5 revolutions on each of the faces you need to work on. Let the paper and pottery wheel do the work , there's no need to put pressure on them, just make sure they're level with the sheet and let it glide while you make an oval motion.
Once you've repeated this on each of your dice give them a really good rinse, if you have dust in any of the numbers use your toothbrush to get anything out.
Get rid of the water you used for this step, wipe out your bowl and refill it for the next step.
Step 5 - Blue Zona Polishing Paper
Dip your Blue Zona Paper in your bowl of water and put it on your flat surface just like you did with the previous sheets.
Do 6 revolutions on each of the faces you need to work on. Let the paper and pottery wheel do the work , there's no need to put pressure on them, just make sure they're level with the sheet and let it glide while you make an oval motion.
Get rid of the water you used for this step, wipe out your bowl and refill it for the next step.
Step 6 - Pink Zona Polishing Paper
Dip your Pink Zona Paper in your bowl of water and put it on your flat surface just like you did with the previous sheets.
Do 6 revolutions on each of the faces you need to work on. Let the paper and pottery wheel do the work , there's no need to put pressure on them, just make sure they're level with the sheet and let it glide while you make an oval motion.
Get rid of the water you used for this step, wipe out your bowl and refill it for the next step.
Step 7 - Teal Zona Polishing Paper
Dip your Teal Zona Paper in your bowl of water and put it on your flat surface just like you did with the previous sheets.
Do 6 revolutions on each of the faces you need to work on. Let the paper and pottery wheel do the work , there's no need to put pressure on them, just make sure they're level with the sheet and let it glide while you make an oval motion.
Get rid of the water you used for this step, wipe out your bowl and refill it for the next step.
Step 8 - White Zona Polishing Paper
Dip your White Zona Paper in your bowl of water and put it on your flat surface just like you did with the previous sheets.
Do 8 revolutions on each of the faces you need to work on. Let the paper and pottery wheel do the work , there's no need to put pressure on them, just make sure they're level with the sheet and let it glide while you make an oval motion.
Repeat this through each of the faces you previously worked on until you get through all of them.
Step 9 - Novus Plastic Clean & Shine
Dry all of your dice off pretty well and then give them a nice spray down with your Novus spray, then using a microfiber towel give them a good wipe down.
When you've gotten through all the dice you've officially polished a set of dice!
CONGRATULATIONS.
That's a huge feat!
You'll find that as you sand and polish more and more you'll find techniques that work better for you.
There's no one right way to polish dice so this is just the way I've found that works best for me.
Step 10 - Finishing Touches
Amazing Job!
You've not only cast yourself some dice, you've polished them now too!
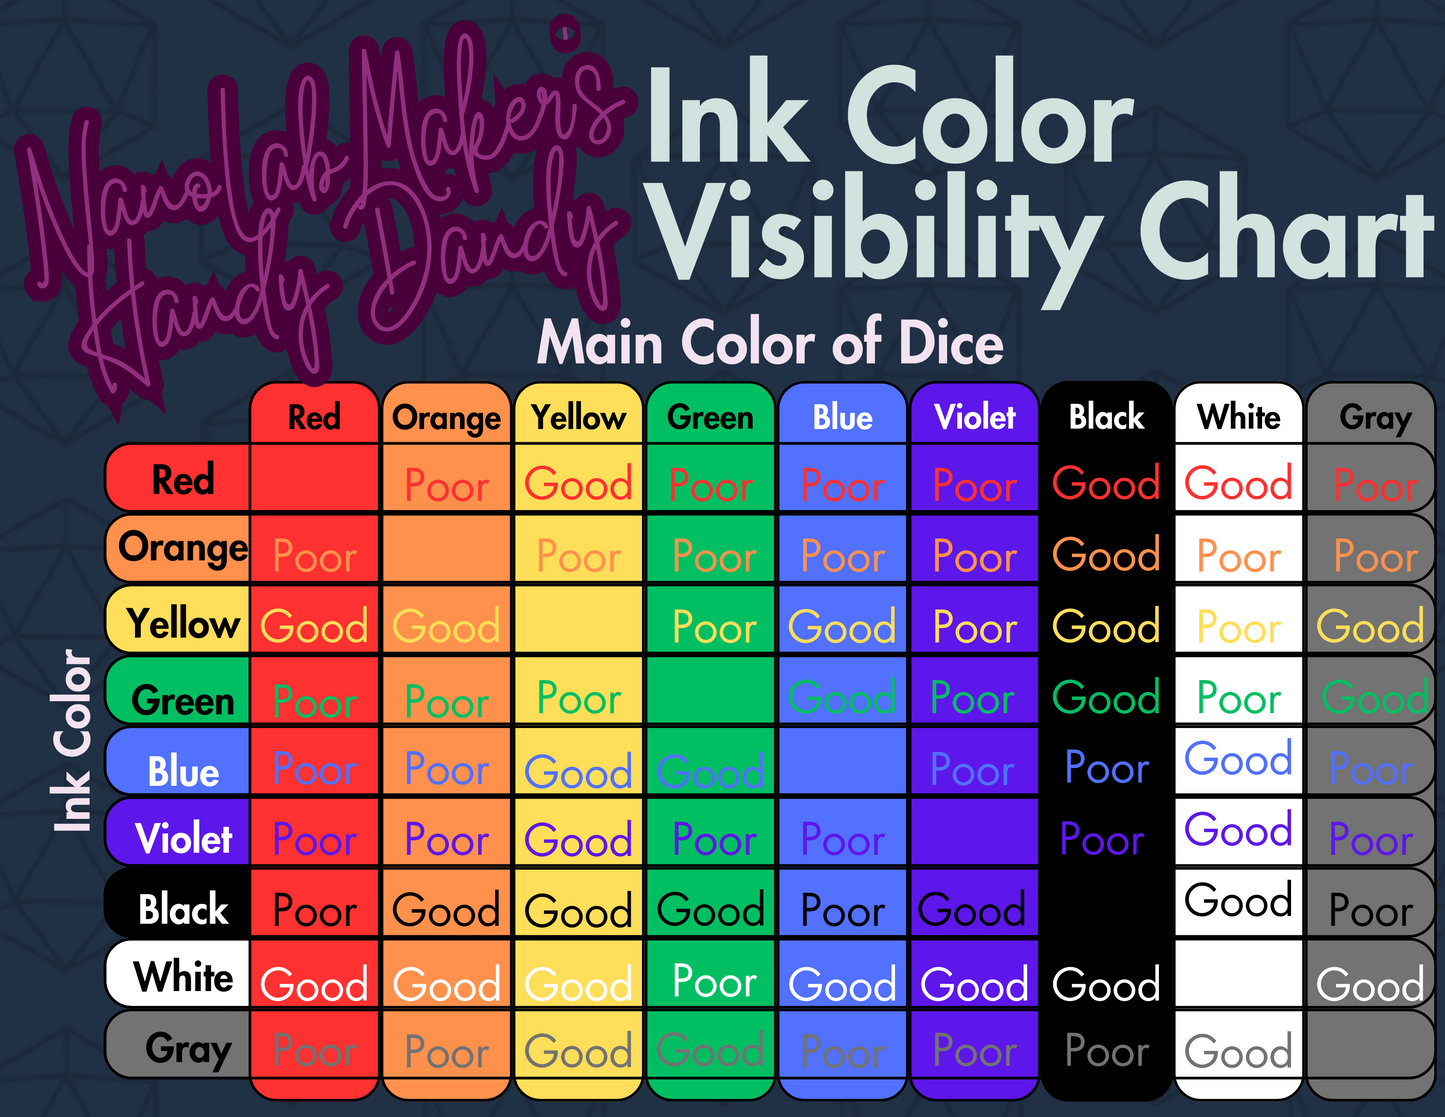
What color are you going to ink them?
Download the free Dice Inking color visibility chart below for some help choosing.
How to Polish Dice by Hand
Step 1 - What do we need to work on?
After waiting at least 72 hours (Check your Resin MSDS for the FULL CURE time frame, sometimes the 24 hours is just cured to TOUCH)
Grab yourself a paper towel and a pen. Draw yourself a grid on your paper towel in a way that you can lay each of the dice on it and have the faces you're working on written next to it, I also like to label which die goes where - that way you don't miss any. While working I keep the dice in water but in between different sheets I have the paper towel to lay them on.
Make note of each of the faces that have flaws that you want to work on, sometimes you can get away with just the 1 faces but often times the ones surrounding them need work as well.
If the flaws you're working on are on the more severe side, you may need to use the 1000 grit sandpaper to take care of those, when this happens I tend to do every side but that is a personal preference - just pay attention for wandering corners. If you don't have anything you need to sand, move onto Step 3 from here.
Step 2 - 1000 Grit Wet/Dry Sandpaper
1000 Grit Sandpaper
Be sure to use your gloves and mask. I prefer to do this step by hand because the pottery wheel can go too far really fast, even with practice.
I use an acrylic disc but you just need a hard smooth FLAT surface to work on.
Dip the die you're working on in your bowl of water and splash a little bit on your sand paper and do 5 very light rotations on each of the faces you want to work on, I prefer to work in more of an oval shape and you don't want to use much pressure here - just let the die glide along the paper. I rinse the die off between each of the faces to get any debris off, you'll really be thanking yourself later when you're not digging sanding dust out of your numbers.
Check the sides you worked on and be sure you've removed most of the flaw, it doesn't entirely need to be gone, you just don't want anything protruding or sharp so we don't tear up the sheet. If there's anything left, go back on those faces with 3 rotations and repeat until you're happy with what you've got.
Swap out your water. You don't want particles sized from the sand paper intermingling with your green sheet water or you're introducing scratches right from the beginning.
Step 3 - Green Zona Polishing Paper
Green Zona Polishing Paper (30 Micron)
If you're coming from step 2 you've already got your water, if you're just starting now you'll need a bowl of water for this step.
Dip your whole zona paper (I use quarter sheets - so 5.5" x 4.25") in your bowl of water and put it on your flat surface - if you're doing this with a pottery wheel you'll want to turn it on to get some excess water out and the sheet will actually suction itself to your plexi, no attachment needed.
Do 20 revolutions on each of the faces you need to work on. Let the paper do the work though, there's no need to put pressure on them, just make sure they're level with the sheet.
Once you've gone through all of the faces you want to work on check them over and be sure you've removed the flaws you were able to and you're happy with the result, if not do an additional 5 revolutions on each face you're not happy with and repeat until you are.
Any imperfection you see after this step will be in the end product, but remember these are handmade - it's okay to have a few maker marks.
Once you've repeated this on each of your dice give them a really good rinse, if you have dust in any of the numbers use your toothbrush to get anything out, I find doing like a C motion down into the number with the bristles works best.
Get rid of the water you used for this step, wipe out your bowl and refill it for the next step.
Get rid of the water you used for this step, wipe out your bowl and refill it for the next step.
Step 4 - Gray Zona Polishing Paper
Dip your Gray Zona Paper in your bowl of water and put it on your flat surface just like you did with the green sheet.
Do 15 revolutions on each of the faces you need to work on. Dipping into your water between each of the faces. Let the paper do the work, there's no need to put pressure on them, just make sure they're level with the sheet and they'll do their part.
Repeat this through each of the faces you previously worked on until you get through all of them. Once you're done rinse them off nicely and dump your water. Wipe out your bowl and give it a refill again.
Get rid of the water you used for this step, wipe out your bowl and refill it for the next step.
Step 5 - Blue Zona Polishing Paper
Dip your Blue Zona Paper in your bowl of water and put it on your flat surface just like you did with the previous sheets.
Do 20 revolutions on each of the faces you need to work on. Dipping into your water between each of the faces. Let the paper do the work, there's no need to put pressure on them, just make sure they're level with the sheet and they'll do their part.
Repeat this through each of the faces you previously worked on until you get through all of them. Once you're done rinse them off nicely and dump your water. Wipe out your bowl and give it a refill again.
Step 6 - Pink Zona Polishing Paper
Dip your Pink Zona Paper in your bowl of water and put it on your flat surface just like you did with the previous sheets.
Do 30 revolutions on each of the faces you need to work on. Dipping into your water between each of the faces. Let the paper do the work, there's no need to put pressure on them, just make sure they're level with the sheet and they'll do their part.
Repeat this through each of the faces you previously worked on until you get through all of them. Once you're done rinse them off nicely and dump your water. Wipe out your bowl and give it a refill again.
Get rid of the water you used for this step, wipe out your bowl and refill it for the next step.
Step 7 - Teal Zona Polishing Paper
Dip your Teal Zona Paper in your bowl of water and put it on your flat surface just like you did with the previous sheets.
Do 30 revolutions on each of the faces you need to work on. Dipping into your water between each of the faces. Let the paper do the work, there's no need to put pressure on them, just make sure they're level with the sheet and they'll do their part.
Repeat this through each of the faces you previously worked on until you get through all of them. Once you're done rinse them off nicely and dump your water. Wipe out your bowl and give it a refill again.
Get rid of the water you used for this step, wipe out your bowl and refill it for the next step.
Step 8 - White Zona Polishing Paper
Dip your White Zona Paper in your bowl of water and put it on your flat surface just like you did with the previous sheets.
Do 40 revolutions on each of the faces you need to work on. Dipping into your water between each of the faces. Let the paper do the work, there's no need to put pressure on them, just make sure they're level with the sheet and they'll do their part.
Repeat this through each of the faces you previously worked on until you get through all of them.
Repeat this through each of the faces you previously worked on until you get through all of them.
Step 9 - Novus Plastic Clean & Shine
Dry all of your dice off pretty well and then give them a nice spray down with your Novus spray, then using a microfiber towel give them a good wipe down.
When you've gotten through all the dice you've officially polished a set of dice!
CONGRATULATIONS.
That's a huge feat!
You'll find that as you sand and polish more and more you'll find techniques that work better for you.
There's no one right way to polish dice so this is just the way I've found that works best for me.
Step 10 - Finishing Touches
Amazing Job!
You've not only cast yourself some dice, you've polished them now too!
What color are you going to ink them?
Download the free Dice Inking color visibility chart below for some help choosing.

Share